Portfolio
Here are a few of the projects that I have worked on in the past that have contributed to my developing interest in design and robotics.
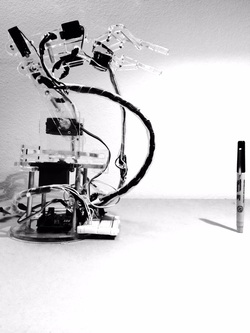
MIVINCI is a robotic arm kit that can be controlled from anywhere in the world, from your couch at home to the jungles in Africa (if there is wifi). MIVINCI can also be controlled manually in person using a Wii Nunchuck.This kit will allow students to develop a deeper understanding of robotics by providing a tool that can be used to teach about mechanical, electrical and computer engineering. Our web page provides the interface that allows you to control the robotic arm with live video feedback. This kit will also be open source to help promote learning about robotics. Step-by-step instructions will be available to walk students through building each part of the robot, along with the engineering theory behind it.
We are allowing the users to come up with their fun, creative ways they use MIVINCI. Some ideas may be to pinch your little brothers cheeks at home while you're on vacation in New Zealand. Or maybe you want to feed your dog at home while you're away. Whatever the case may be, students can post what they have used MIVINCI for on our webpage.
We are hoping that what we have learned from developing this kit will teach students about robotics and inspire them to work on other robotic projects in the future. Learning robotics at a young age will give children both the theoretical and hands on experience that will allow them to apply the knowledge they learn towards other applications in the future such as in the health-care, manufacturing, and agricultural field. Our goal is to help kids learn and have fun while doing it.
You can visit our webpage at http://www.dylandrotman.com/mivinci to learn more about MIVINCI
KUSI Morning News in San Diego: http://www.kusi.com/video?clipId=9603598&autostart=true
San Diego Union Tribune: http://www.utsandiego.com/news/2013/Dec/07/mini-makers-faire-invention-drone-del-mar/?#article-copyNews
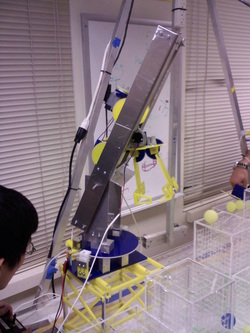
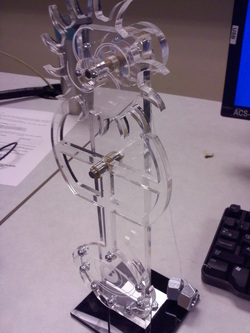
Microalignment Device
For my senior design project, I worked with a team to develop a 4x scale working prototype of a
microalignment device that is used to move within a ± 2 mm range in the x, y, and theta direction.
Pass it Carefully Robotic Contest 2013
The purpose of this contest was to autonomously transfer six balls sitting on top of three dark and three light colored tubes from one turntable to another. The tubes on both turntables could be placed in any color order or position. The unloading and loading zones to pick up the balls was only allowed to stay within a stationary 45° angle having its vertex at center of the turntable. We had to transfer all of the balls in under five minutes without any balls falling off of the small holes. Our team accomplished the task by moving all six balls in 23 seconds finishing in 4th place out of around 200 students.
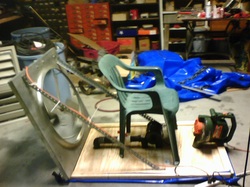
Junkyard Derby 2013
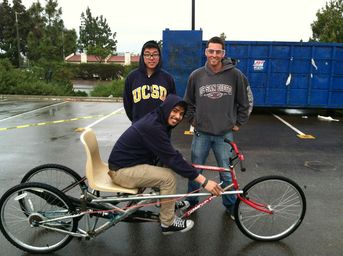
The Junkyard Derby is an event held by UCSD where each team is given two days to build a vehicle from scrap found at a junkyard and each car is raced down a hill.
The Beast
For this robotic competition, we were to build a robot designed to collect as many bouncy balls as possible. Four bouncy balls were placed on top of each acrylic building with each building representing a different amount of points. Our goal was to move these balls over to different bins within a designated time frame. We competed against one team each round and the team who collected the most points by the end was the winner. We unfortunately did not make it to the finals but we were close. It was a great experience and it taught me a valuable lesson: simple is always better.
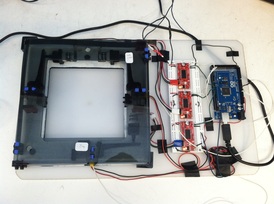
Mini Dynamometer
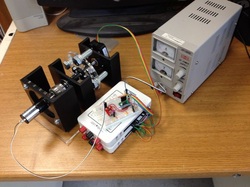
This Mini Dyno was one of the research projects I worked on in the UCSD Coordinated Robotics Lab. It was used to characterize small DC motors by measuring and recording voltage, current, speed and temperature. I worked on the mechanical design, wiring, and circuit diagram for this project. This project is now used as an educational tool in the MAE undergraduate course used for robotics. It is also being used by National Instruments as a tool for showing the performance of the myDAQ. If you would like to learn more information about the project, you can also refer to the website of the original Dyno.
http://fccr.ucsd.edu/w/index.php/Public:Dyno
http://fccr.ucsd.edu/w/index.php/Public:Dyno
GeneFluidics
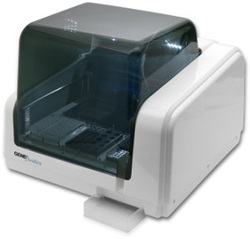
The robot shown to the left is the robot Proteus which is an automated system used for molecular analysis. To learn more about how this system works, you can visit the company website.
http://www.genefluidics.com
http://www.genefluidics.com
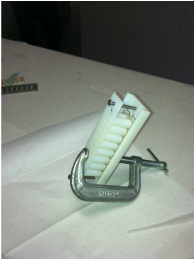
Superhydrophobic Coating
|
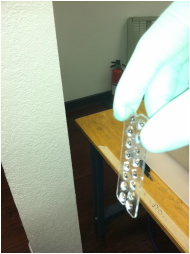
I developed a new method for applying superhydrophobic coating to a sensor chip for the robot Proteus. Superhydrophobic coating when applied to a clean surface will repel any liquid that is applied after. I used the 3D printer to design a device that allowed the coating to be applied only to the sensor chip surface. This allowed the liquid to remain on each sensor when performing assays resulting in better readings from each of the sensor chips. The picture below shows how each drop remains on the individual sensors even when tilted.
|
|
Hovercraft
This was a project I worked on in highschool. It was a competition against other students to design and manufacture a working hovercraft. Not only did mine run, but it could carry three people standing on it. Steering it was a bit difficult, but it was a lot of fun.
Clock Project
This was one of the very first hands-on assignments I had to work on as an undergraduate. We had to design a grandfather clock type mechanism. Simple project but gave me some exposure to using the Lasercamm.
Photovore Robot, Personal Project
This was a side project I started in order to learn more about using the Arduino. I built a photovore robot which is just a robot that's afraid of the dark. It uses light as the input and and depending on the intensity of the light the robot approaches, it adjusts the output voltage. The varying voltage changes the direction of two modified continuously rotating servos. From the video below, you can see that as the robot approaches the shadows, it changes direction. This allows the robot to be object-avoidant as well. I also adjusted the coding so the robot was afraid of the light. Although I threw together a makeshift design from parts I found lying around my house , I learned a lot from this project relating to wiring and circuit design.
Hexapod, Personal Project
This is an ongoing project but the video below shows its first steps. I am working on a hexapod controlled by a iPhone or Android app. Also, I promise that would not be my number one choice of background for the video
Mechanical Clapper, Personal Project

This is a device I created to turn off the light in my room. Clappers have been around for a long time, but I decided to put my own twist on it. Normally, a clapper activates a switch when somebody claps creating a closed or open connection usually controlled from a relay. However, I wanted to create a mechanical clapper. So rather than opening and closing a circuit, I used the sound to be read from a sound sensor that rotates a motor, turning an axle that is connected to a pulley that physically rotates the knob that turns the light on and off. I used scrap parts lying around to make this. The light is out of the picture but the pulley system is set up by using two shoestrings tied together haha.
The Zip It
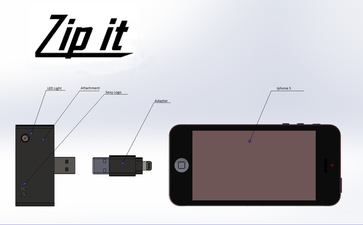
Cell phones have recently been legalized on airplanes because people have discovered a way to prevent cell phone signals from disrupting navigation equipment. In my entrepreneurship class, we were instructed to develop a product that would prevent cell phones from disrupting other passengers while they were riding on an airplane. I decided to create a prototype that prevents passengers from talking above a certain decibel level. If someone does talk above this point ,an LED light will turn on, a buzzer will go off, and the device will shock the passenger. I modeled the shocking element after Tickle Me Elmo™ by using a modified continuous rotating servo with a weight on one end. When it is rotated at high speeds, the counterbalanced weight causes a vibration. Although this may not be a realistic solution, it was a fun project. The photo above shows the design and the video shows the prototype.
boardHitch
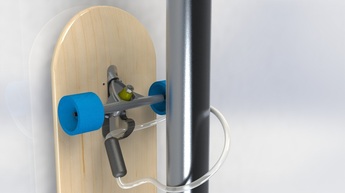
Bike locks are a common way to secure your bike, but what about skateboards? boardHitch is a company developed by three other UCSD students and I in order to provide skateboarders with the option to lock their board. We developed a simple, low profile design that attaches directly to one of the skateboard trucks. It provides a loop large enough to allow any bike lock to fit through giving riders the option to lock their board to any post. The loop will be secured to the board using standard longboard hardware. The pictures to the left shows the initial design. Our first prototype can be seen on our company website and facebook page.
Website: http://www.boardhitch.webs.com
Facebook page: https://www.facebook.com/boardHitch
Website: http://www.boardhitch.webs.com
Facebook page: https://www.facebook.com/boardHitch
If you would like to learn more about the projects I worked on, you can either refer to my resume, LinkedIn account at the top of the page, or shoot me an email.
